This video shows an easy way to add an image or graphic to Word 2019 for Windows or Word 2019 for macOS. It also shows how to resize the image. Narrator Ian Lamont is the publisher of In 30 Minutes guides, including Microsoft Word In 30 Minutes and the Word 2019 Reference and Cheat Sheet.
This video shows a quick way to adjust margins in a Microsoft Word 2019 document (Word 2019 for Windows or Word 2019 for macOS). Narrator Ian Lamont is the publisher of In 30 Minutes guides, including Microsoft Word In 30 Minutes and the Word 2019 Reference and Cheat Sheet.
Backstage View is an integral part of Microsoft Word, Excel, and PowerPoint. This video shows the features of Backstage View in Word 2016 and Excel 2016, including printing, sharing, options, account information, and exporting as PDF or saving a file as an alternate file format. It also explains the difference in Backstage View in Windows and Mac. The narrator is the publisher of In 30 Minutes Guides, including Microsoft Word In 30 Minutes.
In two minutes, learn how to convert a Microsoft Word 2016 document to a PDF document in Windows. The video is narrated by the publisher of Microsoft Word In 30 Minutes.
If you are editing a Microsoft Word file, you may be frustrated that the text is too small. This 4-minute video shows two methods for changing the zoom settings, as well as how to change the font setting for small selections of text. This applies to Microsoft Word 2016 for Windows and macOS. This video is narrated by the publisher of In 30 Minutes guides, including Microsoft Word In 30 Minutes.
One of the most distracting things for Microsoft Word and Dropbox users is the Dropbox icon or Dropbox badge that shows up on the right side of the screen in Microsoft Word 2016, as well as other Microsoft Office programs such as Excel 2016 and PowerPoint 2016. This 2-minute video shows how to hide the Dropbox icon. Narrated by the author of Dropbox In 30 Minutes.
In less than 3 minutes, learn how to take a .doc or .docx file and export a PDF from a Microsoft Word 2016 for Windows and Microsoft Word 2016 for macOS (part of the Microsoft Office 365 suite). Two Microsoft Word export methods are shown. It’s very useful for restricting editing on a Word doc or sharing a Microsoft Word file with someone who doesn’t have Microsoft Word 2016 or the Microsoft Word app for Android or iOS. The Microsoft Word 2016 PDF export tutorial is a huge time-saver for Microsoft Word users, including teachers, lecturers, entrepreneurs, students, community leaders, government officials, managers, and others who want to save time with Microsoft Word. The narrator is the publisher of In 30 Minutes Guides, including Microsoft Word In 30 Minutes.
In less than 3 minutes, learn how to set up the Microsoft Word Quick Access toolbar in Word 2016 for Windows and macOS (part of the Microsoft Office 365 suite). The Microsoft Word 2016 Quick Access Toolbar is a huge time-saver for Microsoft Word users, including office managers, students, teachers, entrepreneurs, startup founders, community leaders, government officials, and others who want to save time with Microsoft Word 2016. It sits at the top of the screen in Word and gives users easy access to frequently used functions such as save, quick print or spell check. The narrator is the publisher of In 30 Minutes Guides, including Microsoft Word In 30 Minutes.
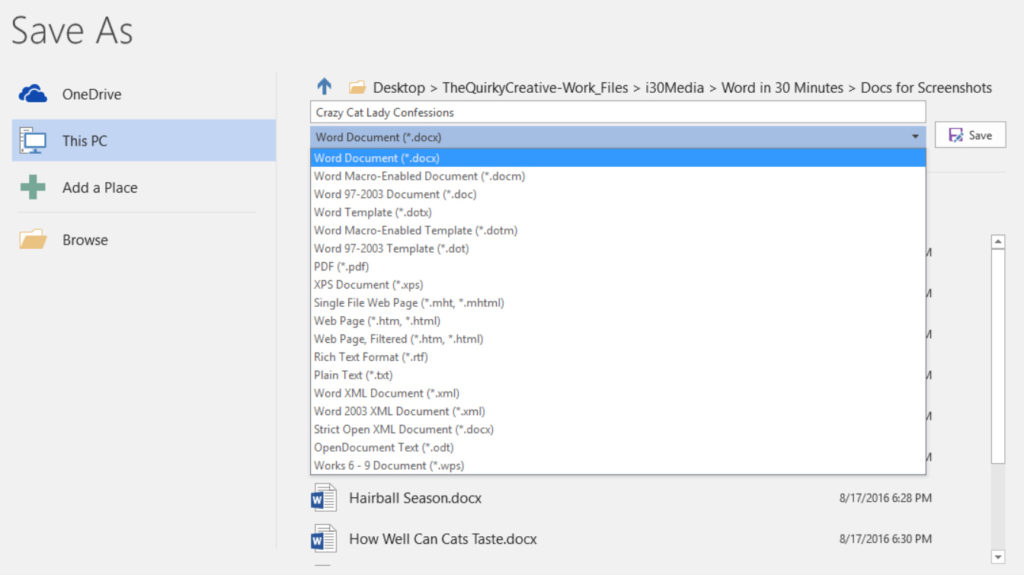
Word 2016 includes 19 different file formats to choose from. Is there a best Microsoft Word file format to use? The answer to that question really depends on your needs. For instance, if you want to have a file whose onscreen appearance looks just like it will appear when it is printed out, then PDF is the logical choice. If, on the other hand, you are looking for a format that supports all of the latest Word features, then .docx would be the best Microsoft Word file format to use.
It’s a safe bet you will never need the majority of Microsoft Word file formats, which include HTML web pages and obscure XML formats. The ones you are most likely to use are:
- Word Document (.docx). This has been the default file format since the release of Word 2007. You can identify this file type by the extension .docx at the end of the file name. Save your files as this type unless you have a reason to use one of the types that follow.
- Word 97-2003 Document (.doc). There are still older versions of Microsoft Word in use. If someone you know is using a version of the software that is more than 10 years old, you will probably need to share a .doc version of the file with them. Note that while .doc files can be opened on newer versions of Word, certain features of Word 2016 may be incompatible.
- Word Template. You have learned a little about the templates Microsoft has included with Word 2016, but did you know that you can also create your own? To save a document as a reusable template, you will use the template file setting, identifiable by the .dotx at the end of the file name.
- PDF. Short for Portable Document Format, this is a file type commonly associated with Adobe products. The .pdf file format is an excellent one to use if you want to send your document to someone who does not have access to Word. You can also send a PDF to someone who is only supposed to read the document without having the ability to edit the text (PDFs are difficult to edit). PDF documents can be opened with free Adobe Acrobat Reader software or other applications.
- Text. Select the Plain Text option to create a text-only version of the document with a .txt suffix. There won’t be any page headings, formatting, comments, or other annotations, but the file can be opened and edited on practically any computer using a wide variety of applications.
- Rich Text Format. This is a hybrid format that allows text documents to have limited formatting, such as bold, bullets, or special fonts applied. Look for .rtf at the end of the file name.
Here is the Save As view for Word 2016:
Word Online has just a handful of file formats available via File > Save As. The default format is .docx, and there is an option to export a PDF version of the document.
This post is excerpted from Microsoft Word In 30 Minutes by author Angela Rose.
The following post about Backstage View is excerpted from Microsoft Word In 30 Minutes.
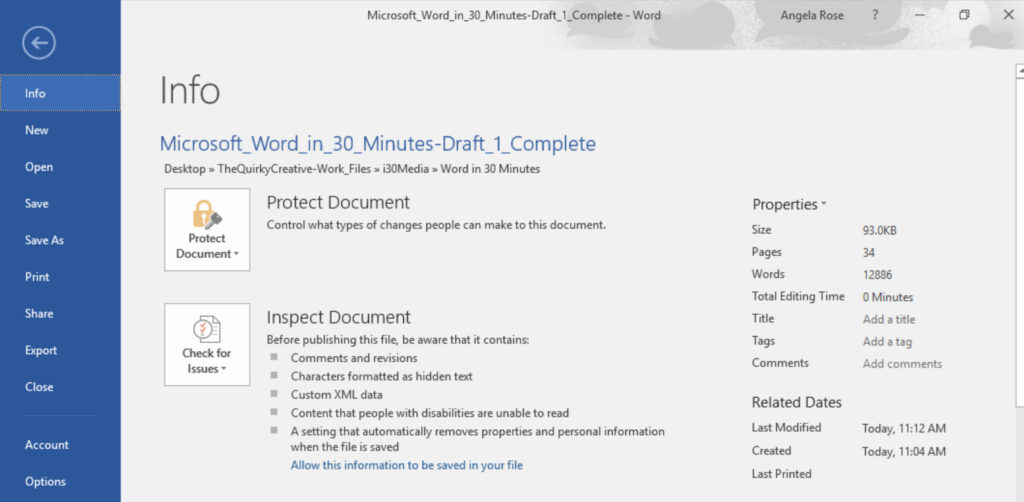
Word 2016’s Backstage View screen is a one-stop shop for many common tasks, including starting new documents and saving files. The Windows version of Backstage View also includes additional features, such as exporting files, printing, and changing certain software settings.
You can get to Backstage View at any time by clicking on File (Windows or Word Online) or the File icon (macOS) located at the top left of your screen. Navigating Backstage View is easy, thanks to the simple menu displayed on the left side of the screen:
We will go into more detail on many of these menu items later in the book. For the time being, here’s a quick overview of the tools in Backstage View for the Windows version of Word 2016:
- Info. Review your document’s properties such as file size, page count, and word count. You can also access tools for protecting, inspecting, and managing the document.
- New. Start a new document from scratch or select a template for customization.
- Open. Open an existing document stored on your computer, network, or the cloud.
- Save and Save As. Select one of these options to save your document under its current file name or save a copy in a new location, under a new file name or as a different file type.
- Print. This is where you will go when it’s time to print your Word document.
- Share. Word 2016 includes a number of collaboration features. You will learn the basics of sharing documents in Chapter 5 of Microsoft Word In 30 Minutes.
- Export. Save a document as .doc or .docx, or create a PDF version.
- Close. If you don’t want to close your Word document using the “X” in the top-right corner of the document, you can click Close in Backstage View.
- Account. If you have purchased an Office 365 subscription, you can access your account settings and recent updates here.
- Options. Word 2016 includes plenty of settings you can customize to your liking.
To exit the Backstage View screen and return to your document, simply click on the back arrow at the top of the menu (Windows or Word Online) or click the Cancel button (macOS).
Backstage View for the Mac version of Word 2016 covers new file creation and opening existing documents, as well as access to basic account information. However, Save As, Print, Share, Export, and Close are not visible from the Mac version of Backstage View and have to be accessed via the File drop-down menu at the top of the screen. As for Options, many settings in the Mac version of Word 2016 can be accessed via Word > Preferences.
Backstage View in Word Online is similar to the full Windows version, but does not include Options or Account.


